Showing posts with label MessageExport. Show all posts

Tuesday, January 21, 2014

Converting Email with Microsoft Outlook 2013 Rules and MessageExport Add-On, Part 2

Our previous article focused on setting up a Microsoft Outlook 2013 rule. This article begins from there, and describes how to configure the MessageExport add-in for Microsoft Outlook to perform a complex automatic email handling operation.

The first step of our project involved creating an Outlook rule to collect messages we received from a client's email domain and copy them to a specific Outlook folder.

This article describes Step 2: Creating a custom MessageExport profile. It will perform these 4 functions:

a. Convert new messages added to a folder into PDF files.
b. Delete the messages after they have been converted.
c. Perform this operation again in xx minutes.
d. Prevent duplicate PDF files by remembering which emails have already been exported.

Getting Starting.


If you haven't already, download and install copy of MessageExport for Outlook. The free trial runs for 15 days, and will allow you to follow along with this article.

After installation, MessageExport appears in Outlook 2013 on a separate tab.

Image shows the MessageExport toolbar in Outlook 2013
MessageExport in Outlook 2013


Converting Email with Microsoft Outlook 2013 Rules and MessageExport Add-On.

The MessageExport Add-in for Microsoft Outlook by Encryptomatic LLC extends Outlook's ability to convert, export and copy email messages automatically.  Our article today looks at various ways that you can use Microsoft Outlook Rules and MessageExport together to perform a complex email processing operation.

While MessageExport will address the needs of most people right out of the box, sometimes custom solutions need to be created. MessageExport does not integrate directly to Outlook rules, but using them together provides a vast range of possibilities for email processing.

We're often surprised at how people use MessageExport. It was designed to give users a wide range of options to design custom solutions to their email content management challeges. We love hearing about the creative ways that people use MessageExport and the real-life issues our software helps people solve.

Today we are designing a solution that will result in email messages received in Outlook, from a specific client domain, being converted into a PDF file, copied to a specific folder, and then the original email message in Outlook will be deleted.

Let's break down our project. The steps in involved in this project include:
1. Creating an Outlook rule to collect messages from the client's email domain into an Outlook folder
2. Creating a custom MessageExport profile that will perform these 3 functions:

a. Convert new messages added to a folder into PDF files
b. Delete the messages after they have been converted
c. Perform this operation again in xx minutes.

This is a two part article. This first portion will focus on setting up the Outlook 2013 rule that will accomplish step 1, above. The second part of this article will focus on step 2, setting up MessageExport.

Getting Started

This article assumes that you have Outlook 2013 and the MessageExport add-in for Outlook installed. The steps will be similar for earlier versions of Outlook, but there will be some differences in the location of the rules menu.

The first thing we'll want to do is to create a new folder in Outlook where we will copy email messages that we want to convert into PDF files.

First decide where to place your new folder in your Outlook tree structure. I've decided to create a new folder called "Emails to PDF" beneath my Inbox. To do this I right click on Inbox, select New Folder, and apply my name, and press Enter.

Image shows the Outlook folder structure and a new folder called Email To PDF
Create a new email folder in Outlook 2013

Now that we have our folder, lets setup an Outlook Rule to toss emails in there.


Setting up Outlook Rules


In Outlook 2013, Microsoft Outlook's rules can be accessed by going to File > Outlook Rules &  Alerts.

Image shows the location of Outlook 2013 Rules and Alerts.
Outlook 2013 Rules & Alerts
Click on Rules and Alerts, and a window will open. To create a new Outlook rule, click New Rule.

Click 'New Rule' to create an Outlook rule.

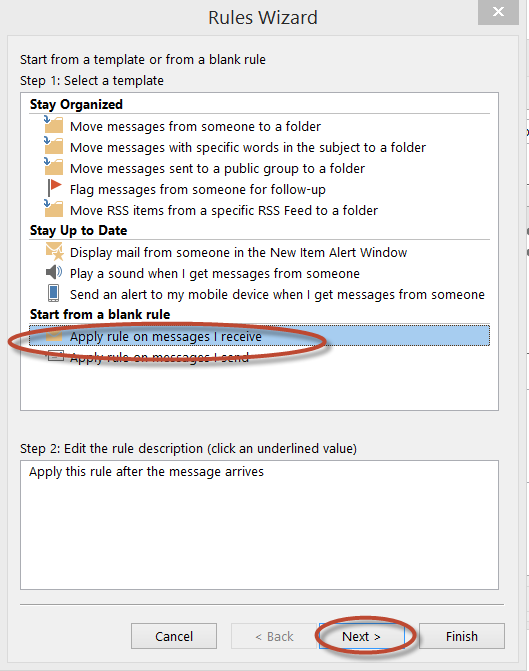
 This will being up a new window. Find "Start from a blank rule" and choose "Apply rule on messages I recieve." Click "Next" to continue.


The following image has quite a bit going on. It is not as difficult as it looks, I promise. I indicated the different areas where you will need to make a selection.

In Step 1, mark the line "with specific words in the recipient's address.

In Step 2, click "specific words."  This will open another window called Search Text.  Enter your client's domain name into this field and click "Add."

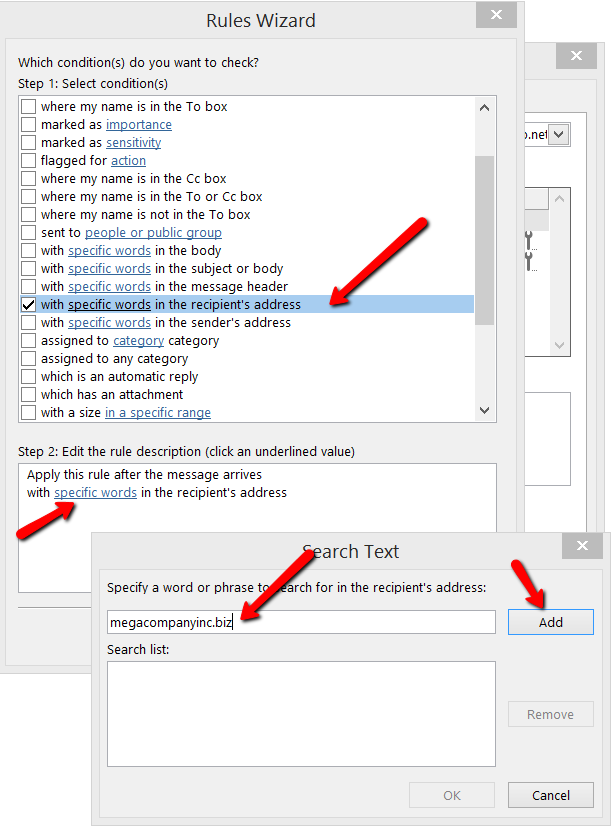
Outlook Rules Wizard, Steps 1 and 2.
When you're done, click "OK" to close the Search Text box, and then "Next" in the Rules Wizard.

The Rules Wizard will advance to the next page.  Since we want to move emails from our client to a specific folder, check the box next to "move it to the specified folder."  In Step 2, you'll need to specify the client's domain name. In my example, any email from the domain Megacompany.biz (my client) will be copied to a folder that I specify.  Entering the domain name (not the entire email address) will include all email received from your client. 

Now lets specify the folder where all email from the client will be copied to. Click the word "specified" to open up a second window where you'll choose the folder you created earlier. I selected my folder "Email to PDF."

Image shows the Outlook 2013 Rules Wizard. "Move it to the specified folder" is selected.
Move email to the specified folder

Click ok to close out.

Congratulations! You've just created a Windows Rule to copy all email received from your client into your selected folder.

Click through to part 2 of this article, and we'll show you how to setup the MessageExport add-in for Microsoft Outlook to process the email folder we just created, converting email messages to PDF, and then deleting the messages.


Wednesday, November 13, 2013

MessageExport for Outlook has been updated


Encryptomatic LLC today announced the availability of MessageExport 2.3.  MessageExport is an add-in software that extends Microsoft Outlook's email exporting abilities. MessageExport is the premier tool for converting Outlook email messages to formats that include .pdf, .eml, .mht, .tif, text, and many others. 


MessageExport 2.3 adds compatibility for Windows 8.1.  It includes a new file naming function that allows for indicating the presence of file attachments in the file name.  When opening a .pdf file with embedded file attachments, the attachments panel will now open automatically in Adobe Reader.

To download a 15 day free trial of MessageExport, and to learn more about it's advanced Outlook email exporting functions, please visit the MessageExport home page.

The change log for MessageExport 2.3.0.114 follows:
======================================================================================================
- 0003436: [Development] Windows 8.1 compatibility
- 0002732: [Add] An option in the naming schema to indicate if there is an attachment
- 0003401: [Add] Set PDF viewer to open Attachments Panel if there are attachments embedded to pdf
- 0003405: [Fix] Resolved an issue where PowerPoint was being closed during scheduled export execution
- 0003404: [Development] Resolved negative values for Scheduler interval
======================================================================================================

Tuesday, May 14, 2013

MessageExport: The Outlook Add-In For Email Export

If managing your Outlook email content is important to your work, then MessageExport is a tool that can save you a great deal of time and effort.

MessageExport is an add-in for Microsoft Outlook (2016/2013/2010/2007) that greatly expands your ability to save and convert your email messages. For more than six years, MessageExport has been an important tool for people who need to manage email content, simplifying the process of converting and copying email messages from MS Outlook to neutral formats such as .pdf, .eml, .mbox, .csv, and more.

With MessageExport, you can convert Outlook emails to different formats either in bulk or individually, and simultaneously perform additional functions, such as compressing the output into a zip file, or copying the output to a specific folder.

MessageExport uses "export profiles" which are selected from a drop down list in the MessageExport's Outlook toolbar. Export profiles are instruction sets that give you a lot of flexibility to determine how MessageExport operates.  MessageExport comes with about twenty pre-configured export profiles, such as, "Export to PDF - attachments converted/included." You can customize profiles, or create entirely new ones.

Choose the export profile in MS Outlook.
Email Export Profiles in MessageExport
To use MessageExport, start by selecting the Outlook email messages you want to convert from the email list.  Once the messages are highlighted, choose the desired export profile from the toolbar dropdown list.  Click the export button to begin the process.

The image below shows the entire process, from selecting Outlook emails, choosing an export profile, and starting the process.

Using MessageExport save Outlook email to PDF

MessageExport can also convert an entire Outlook folder, making it a great tool to use along side Outlook's Rules function. For example, if you want to convert all emails received from a specific email domain into a pdf format and copy it to a shared folder, this can be accomplished quite easily with MessageExport. There are endless ways in which MessageExport's capabilities can be combined in an Export Profile to automate manual email conversion processes.

Common uses for MessageExport

  • Bulk convert email to PDF
  • Convert an Outlook folder into a single PDF file
  • Convert an email and file attachments into a PDF file
  • Convert an email to PDF and embed file attachments within the PDF
  • Convert Outlook emails to EML, MSG or MBOX
  • Save selected Outlook emails into a CSV file
  • Schedule an export profile to run at a specific time interval and process new emails
  • Combine MessageExport with Outlook rules to process specific emails
  • Create specific naming criteria (bates-stamp like) and apply to the file name.
  • And much more.

The best way to learn about MessageExport is to download a 15 day free trial and try it for yourself. 

Sunday, March 3, 2013

Outlook to .msg: How to convert Outlook email to .msg files

Outlook to .MSG Conversion Made Easy

Email messages in Microsoft Outlook are stored in Personal Storage Tables, or PST files.  Sometimes it is convenient to store an individual email message as a separate file so it can be shared.  Outlook 2013 and earlier versions provide this ability.

To save an email as a .msg file in Outlook 2013, click on the email you want to save. Next to go File > Save As and select "Outlook Message Format - Unicode."

Saving Outlook email as msg in 2013.


In cases where it's necessary to save dozens, hundreds or thousands of Outlook emails as individual .msg files, Outlook falls short.  That's where an add-in called MessageExport can take up the slack.

MessageExport extends Outlook's ability to save email messages as .msg files, and many other formats including .pdf.

Outlook 2013 with MessageExport toolbar shown.
MessageExport extensions shown in Outlook 2013
MessageExport provides several options that improve the export operation. For example, a specific naming structure can be applied to the name of the .msg file. If you were exporting, say, 500 emails to .msg format, and you wanted the name of each .msg file to begin with the year it was created, you can easily setup that structure with MessageExport.   To do this, choose the "Export to MSG" file profile from MessageExport's drop down list; next click the Edit icon, and go to the "Export name" tab.

Custom file naming structure
Add the fields that you want to include the file name.  Click OK to save your changes.
Each time you run the "Export to MSG" profile on selected Outlook emails,  MessageExport will name your .msg files according to your plan.

Another tool that MessageExport provides you is "export history."  Enabling this function lets you exclude messages that have already been exported to .msg format, eliminating the possibility of duplicates.

To enable "Export History," click the edit toolbar and go to the "Common" tab.  Check the box that says, "Turn on Export History," then click OK to save that setting to the profile.

Export history helps prevent duplicate emails saved as .msg format.
How to turn on "Export History" to prevent duplicate .msg files

While exporting a few emails to .msg format from Outlook 2013 is easily done, consider using MessageExport for more complex Outlook to .msg file export operations. 

You can try MessageExport free for 15 days. Download a free trial from the MessageExport home page.

When the trial is complete, MessageExport will continue to function, letting you convert individual email messages to .msg, .pdf, .eml, png, gif, tif and other formats!  You can activate the full version at any time by purchasing a key.