Showing posts with label email. Show all posts

Monday, June 9, 2014

How to Save Outlook Email as .EML Files

Saving Outlook Mail As .EML


Outlook email messages are usually stored in Microsoft's proprietary .pst and .msg file format.  In migrating your Outlook email, you may wish to convert your Outlook emails to .eml file format. An .eml file is an open specification file format (RFC-822) used by most non-Microsoft email clients and services.

Microsoft Outlook 2013 has a limited ability to export email messages. It can save individual messages to Text (.txt), Outlook Template (.oft), Outlook Message Format (.msg), and the newer unicode Outlook Message Format (also .msg). 

The Outlook 2013 "save as" menu showing Outlook's native export formats.
Outlook 2013 supported file types.

Wednesday, April 30, 2014

MessageExport Add-in Extends MS Outlook's Ability to Export Email to PDF, TXT, and Other Formats

While Microsoft Outlook is rightly the world's most popular email client, getting your email messages out of Outlook can be a challenge.   MessageExport is an add-in that improves the email export functionality of Microsoft Outlook, adding many new capabilities such as export to pdf, csv, text, html, mbox, gif and other useful formats. 

Developed by Encryptomatic LLC, MessageExport tightly integrates with the Outlook user interface to make it easy to export email from Outlook in different formats.


Introducing MessageExport Add-in for Outlook

MessageExport helps you get your email messages out of Outlook.  It is compatible with Microsoft Outlook 2013, 2010, 2007 and 2003, both 32-bit and 64-bit versions of Outlook, integrating tightly with Outlook's menus.

To use MessageExport, emails are selected from the Outlook email list, an export profile is selected, and then the blue "Export" button is clicked.


MessageExport integration with Outlook main menu toolbar.

Tuesday, January 21, 2014

Converting Email with Microsoft Outlook 2013 Rules and MessageExport Add-On, Part 2

Our previous article focused on setting up a Microsoft Outlook 2013 rule. This article begins from there, and describes how to configure the MessageExport add-in for Microsoft Outlook to perform a complex automatic email handling operation.

The first step of our project involved creating an Outlook rule to collect messages we received from a client's email domain and copy them to a specific Outlook folder.

This article describes Step 2: Creating a custom MessageExport profile. It will perform these 4 functions:

a. Convert new messages added to a folder into PDF files.
b. Delete the messages after they have been converted.
c. Perform this operation again in xx minutes.
d. Prevent duplicate PDF files by remembering which emails have already been exported.

Getting Starting.


If you haven't already, download and install copy of MessageExport for Outlook. The free trial runs for 15 days, and will allow you to follow along with this article.

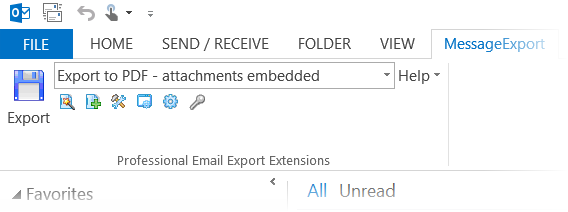
After installation, MessageExport appears in Outlook 2013 on a separate tab.

Image shows the MessageExport toolbar in Outlook 2013
MessageExport in Outlook 2013


Converting Email with Microsoft Outlook 2013 Rules and MessageExport Add-On.

The MessageExport Add-in for Microsoft Outlook by Encryptomatic LLC extends Outlook's ability to convert, export and copy email messages automatically.  Our article today looks at various ways that you can use Microsoft Outlook Rules and MessageExport together to perform a complex email processing operation.

While MessageExport will address the needs of most people right out of the box, sometimes custom solutions need to be created. MessageExport does not integrate directly to Outlook rules, but using them together provides a vast range of possibilities for email processing.

We're often surprised at how people use MessageExport. It was designed to give users a wide range of options to design custom solutions to their email content management challeges. We love hearing about the creative ways that people use MessageExport and the real-life issues our software helps people solve.

Today we are designing a solution that will result in email messages received in Outlook, from a specific client domain, being converted into a PDF file, copied to a specific folder, and then the original email message in Outlook will be deleted.

Let's break down our project. The steps in involved in this project include:
1. Creating an Outlook rule to collect messages from the client's email domain into an Outlook folder
2. Creating a custom MessageExport profile that will perform these 3 functions:

a. Convert new messages added to a folder into PDF files
b. Delete the messages after they have been converted
c. Perform this operation again in xx minutes.

This is a two part article. This first portion will focus on setting up the Outlook 2013 rule that will accomplish step 1, above. The second part of this article will focus on step 2, setting up MessageExport.

Getting Started

This article assumes that you have Outlook 2013 and the MessageExport add-in for Outlook installed. The steps will be similar for earlier versions of Outlook, but there will be some differences in the location of the rules menu.

The first thing we'll want to do is to create a new folder in Outlook where we will copy email messages that we want to convert into PDF files.

First decide where to place your new folder in your Outlook tree structure. I've decided to create a new folder called "Emails to PDF" beneath my Inbox. To do this I right click on Inbox, select New Folder, and apply my name, and press Enter.
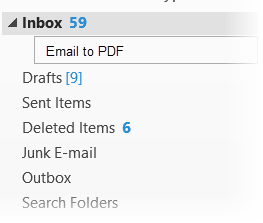
Image shows the Outlook folder structure and a new folder called Email To PDF
Create a new email folder in Outlook 2013

Now that we have our folder, lets setup an Outlook Rule to toss emails in there.


Setting up Outlook Rules


In Outlook 2013, Microsoft Outlook's rules can be accessed by going to File > Outlook Rules &  Alerts.
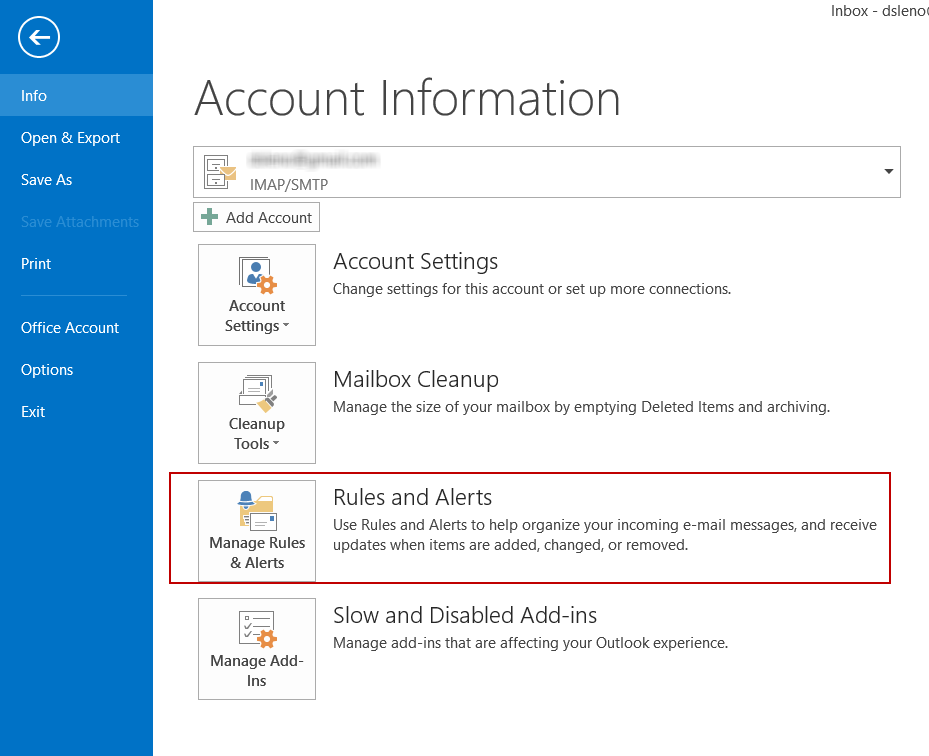
Image shows the location of Outlook 2013 Rules and Alerts.
Outlook 2013 Rules & Alerts
Click on Rules and Alerts, and a window will open. To create a new Outlook rule, click New Rule.

Click 'New Rule' to create an Outlook rule.

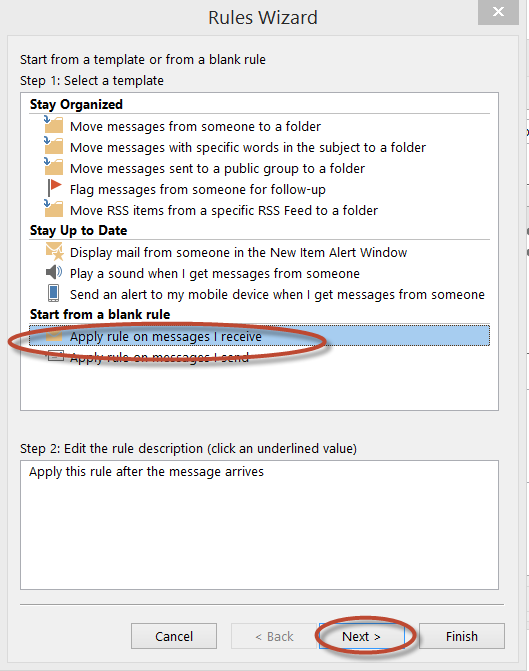
 This will being up a new window. Find "Start from a blank rule" and choose "Apply rule on messages I recieve." Click "Next" to continue.


The following image has quite a bit going on. It is not as difficult as it looks, I promise. I indicated the different areas where you will need to make a selection.

In Step 1, mark the line "with specific words in the recipient's address.

In Step 2, click "specific words."  This will open another window called Search Text.  Enter your client's domain name into this field and click "Add."
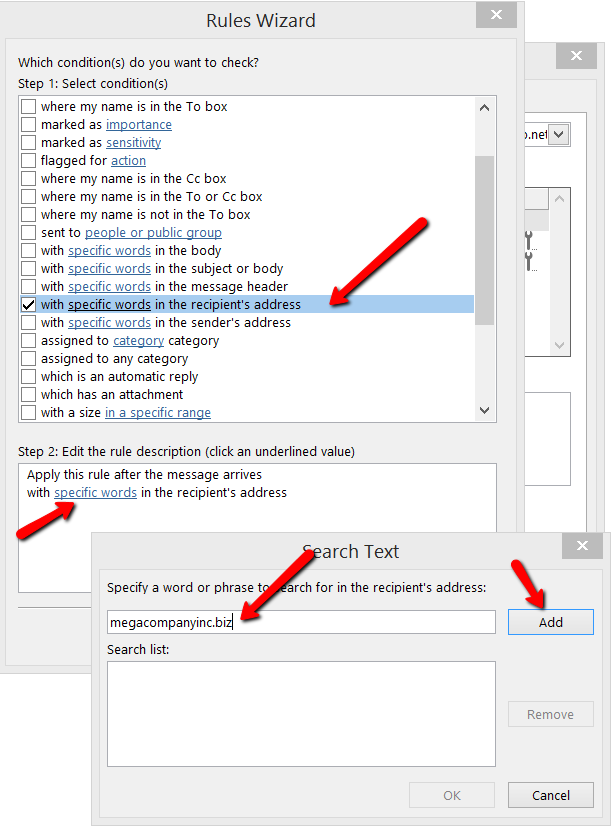
Outlook Rules Wizard, Steps 1 and 2.
When you're done, click "OK" to close the Search Text box, and then "Next" in the Rules Wizard.

The Rules Wizard will advance to the next page.  Since we want to move emails from our client to a specific folder, check the box next to "move it to the specified folder."  In Step 2, you'll need to specify the client's domain name. In my example, any email from the domain Megacompany.biz (my client) will be copied to a folder that I specify.  Entering the domain name (not the entire email address) will include all email received from your client. 

Now lets specify the folder where all email from the client will be copied to. Click the word "specified" to open up a second window where you'll choose the folder you created earlier. I selected my folder "Email to PDF."
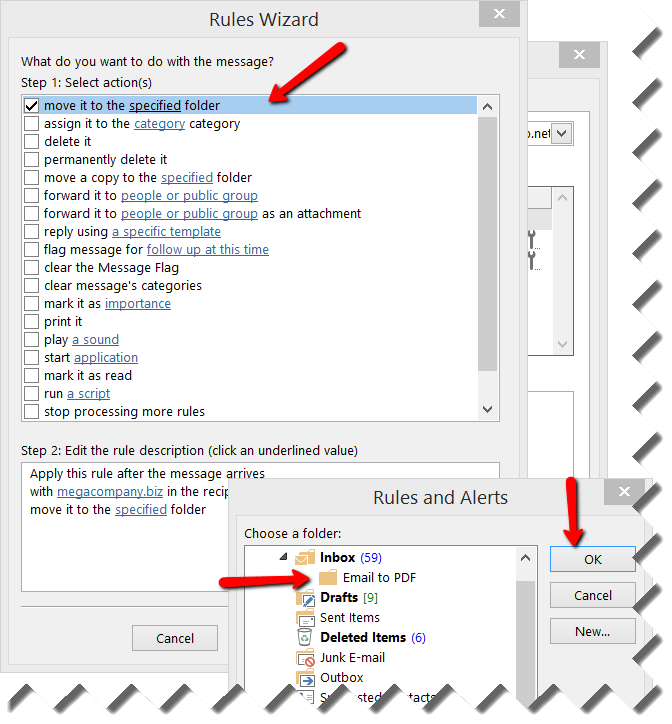
Image shows the Outlook 2013 Rules Wizard. "Move it to the specified folder" is selected.
Move email to the specified folder

Click ok to close out.

Congratulations! You've just created a Windows Rule to copy all email received from your client into your selected folder.

Click through to part 2 of this article, and we'll show you how to setup the MessageExport add-in for Microsoft Outlook to process the email folder we just created, converting email messages to PDF, and then deleting the messages.




Tuesday, May 14, 2013

MessageExport: The Outlook Add-In For Email Export

If managing your Outlook email content is important to your work, then MessageExport is a tool that can save you a great deal of time and effort.

MessageExport is an add-in for Microsoft Outlook (2016/2013/2010/2007) that greatly expands your ability to save and convert your email messages. For more than six years, MessageExport has been an important tool for people who need to manage email content, simplifying the process of converting and copying email messages from MS Outlook to neutral formats such as .pdf, .eml, .mbox, .csv, and more.

With MessageExport, you can convert Outlook emails to different formats either in bulk or individually, and simultaneously perform additional functions, such as compressing the output into a zip file, or copying the output to a specific folder.

MessageExport uses "export profiles" which are selected from a drop down list in the MessageExport's Outlook toolbar. Export profiles are instruction sets that give you a lot of flexibility to determine how MessageExport operates.  MessageExport comes with about twenty pre-configured export profiles, such as, "Export to PDF - attachments converted/included." You can customize profiles, or create entirely new ones.

Choose the export profile in MS Outlook.
Email Export Profiles in MessageExport
To use MessageExport, start by selecting the Outlook email messages you want to convert from the email list.  Once the messages are highlighted, choose the desired export profile from the toolbar dropdown list.  Click the export button to begin the process.

The image below shows the entire process, from selecting Outlook emails, choosing an export profile, and starting the process.

Using MessageExport save Outlook email to PDF

MessageExport can also convert an entire Outlook folder, making it a great tool to use along side Outlook's Rules function. For example, if you want to convert all emails received from a specific email domain into a pdf format and copy it to a shared folder, this can be accomplished quite easily with MessageExport. There are endless ways in which MessageExport's capabilities can be combined in an Export Profile to automate manual email conversion processes.

Common uses for MessageExport

  • Bulk convert email to PDF
  • Convert an Outlook folder into a single PDF file
  • Convert an email and file attachments into a PDF file
  • Convert an email to PDF and embed file attachments within the PDF
  • Convert Outlook emails to EML, MSG or MBOX
  • Save selected Outlook emails into a CSV file
  • Schedule an export profile to run at a specific time interval and process new emails
  • Combine MessageExport with Outlook rules to process specific emails
  • Create specific naming criteria (bates-stamp like) and apply to the file name.
  • And much more.

The best way to learn about MessageExport is to download a 15 day free trial and try it for yourself. 

Monday, March 25, 2013

Outlook Add-On To Mass Extract Photos From Email And Save To Your Destop

In the days before social media, photos were often shared by attaching them to an email message.  If you've been on the internet for a decade or longer, you probably have Outlook email messages with .jpg, .gif or .tif formatted photographs. If you find yourself with a large quantity of Outlook email messages, MessageExport can bulk extract those photographs to a folder where you can organize them better.

MessageExport is a useful add-on for exporting Outlook emails to different places and formats. Download a free trial for Outlook 2013, 2010, 2007, or 2003, and follow along with this step by step guide.

MessageExport for Outlook ad


Depending on how many of your emails that you expect to contain photos, you may want to proceed one of two ways:

The first way would be to simply bulk extract all of the email messages in your inbox to a folder on your disk.

The second approach would be to spend a little time to sort through your emails, using Outlook's search function to find emails from friends and family that may have photographs attached, and then move those emails into a separate folder for processing by MessageExport. It doesn't matter that there may be hundreds of these emails, and it also doesn't matter if some of them do not have photos. By collecting them into a special location, you're starting the process of organizing the photos.

Note that MessageExport will not actually remove the file attachments from your emails, so don't worry about forever separating the files from the messages. Rather, it will copy the files from the email and save them to a folder on your computer that you designate.

Exporting Pictures from Outlook Emails


First, go to the Outlook folder containing the emails that have the pictures you want to save to a disk. Click on the folder, then select all emails in the folder by typing "Ctrol-A".

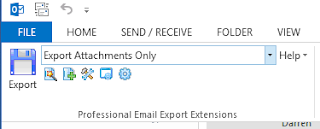
From the MessageExport toolbar, choose "Export Attachments Only."  Then click the "Export" button to start the export process.
MessageExport toolbar in Outlook 2013 showing "Export Attachments Only" setting.
MessageExport Toolbar


Click MessageExport "Export" button to start the export process. Shown in Outlook 2013.
Export Button


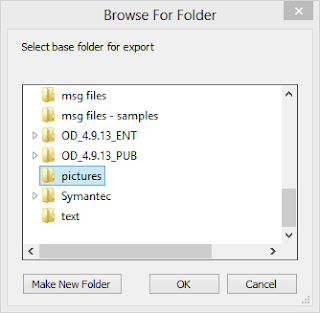
MessageExport will ask you to select a folder where it will copy the file attachments. In our example we will save all files to a folder called "pictures" on our desktop.

Select the base folder for MessageExport to save email attachments to.
Select the target folder.


When the folder is selected, the export process will continue.


When MessageExport has completed the operation, you can go to your folder to view the output.  Notice that MessageExport has created a sub-folder for each email, and has placed the files inside these folders.

Windows 8 file folder with sub-folders.

If you wanted MessageExport to put the files into a single folder, and not create sub-folders, it's easy to change the "Export Attachments" profile to do this.    Here's to make this change.

First, select the "Export Attachments Only,"  profile from the MessageExport toolbar, and then select the Edit button from the toolbar.

MessageExport Toolbar Edit Button


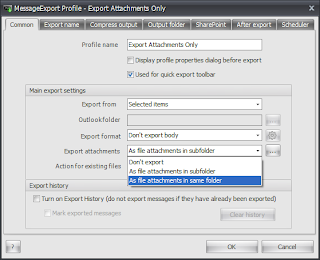
This will bring up the Common Settings page.  Under "Export Attachments," choose:
 "As file attachments in same folder."

MessageExport add-on common settings tab.
MessageExport's common settings tab.


This setting will place all file attachments into a single folder. Click OK to save your change.  Now all files will be saved to the same folder.  Any attachments having the same name will be appended with a sequential number so they will not overwrite another file.

When you complete an export operation, now files will be saved to the same folder.  You can click on Window's Type column to sort the files by file type. For example, all PNG images will be grouped together.

Screen shot of Windows 8 file folder showing PNG files.
Windows folder with PNG files

The same export and editing process will work for other types of email conversions. For example, to save emails with attachments to PDF format, just select the appropriate export profile from MessageExport's Outlook toolbar.

For more information and a free trial, visit the MessageExport Add-on home page.


Friday, October 19, 2012

How to Save Email from Outlook 2010

Outlook 2010 provides the native capability to convert a selected email message to a text file, an Outlook Template, Outlook Message Format (.msg file),  or a Unicode Outlook Message.  Here's how to do it.

First, find the message you want to convert in the Outlook 2010 mail list, and click on it.

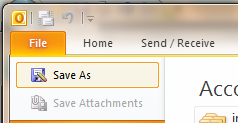
Next go to File > Save As


How to save Outlook 2010 email to disk.
Saving an Outlook email


This will open the "Save As" Window.


Change the file name if you wish, then select one of the shown formats.

When you're done click "Save" and Outlook will copy your message to the target format.

Here's another way to copy to Outlook email to .msg files.

If you are interested in copying your email message to an individual Outlook email file (called a .msg file), another way to accomplish this is to simply drag and drop the message from your Outlook list to your Windows desktop. This .msg file will be named <email subject>.msg.  You can then attach the message to an email message or copy it to a flash drive for sharing.  The .msg file will contain all of the images, header information, and file attachments that were in the original email.

How can you copy Outlook emails to other formats? 


MessageExport is an add-in for Outlook that expands its ability to manipulate and convert email messages to different formats including .eml, pdf, csv (Excel), msg, gif, tif, mbox, and others.  You can download a free trial of MessageExport and use it free for 15 days.