Our previous article focused on setting up a Microsoft Outlook 2013 rule. This article begins from there, and describes how to configure the MessageExport add-in for Microsoft Outlook to perform a complex automatic email handling operation.
The first step of our project involved creating an Outlook rule to collect messages we received from a client's email domain and copy them to a specific Outlook folder.
This article describes Step 2: Creating a custom MessageExport profile. It will perform these 4 functions:
a. Convert new messages added to a folder into PDF files.
b. Delete the messages after they have been converted.
c. Perform this operation again in xx minutes.
d. Prevent duplicate PDF files by remembering which emails have already been exported.
If you haven't already, download and install copy of MessageExport for Outlook. The free trial runs for 15 days, and will allow you to follow along with this article.
After installation, MessageExport appears in Outlook 2013 on a separate tab.
In normal use, a message or group of messages in highlighted in the Outlook mail list. If the user wants to export those highlighted messages to PDF, they would select "Export to PDF" from the drop down list, and then click "Export." MessageExport would then go to work converting the selected emails into PDF files.
Today, we're going to go a little beyond "normal" use and setup a customized MessageExport profile that will accomplish the steps we described earlier.
Since the project we began in our last article calls for converting email in a specific folder into PDF files, lets' begin with the profile that most closely matches what we want to do.
Select the profile named "Export to PDF - attachments embedded." This profile will convert an email into PDF while embedding any file attachments inside the PDF. Those files can later be extracted from the PDF and edited, rather than become part of the PDF image. MessageExport provides several ways of processing email file attachments, including converting them into the PDF image, extracting them, or embedding them as individual files. You can start with the profile that most closely matches our preferences.
Now that we have selected or MessageExport profile, we're going to edit it and create a new profile that will accomplish the three aforementioned steps. To edit the export profile, click the Tools Icon in the MessageExport toolbar.
This will bring up the MessageExport profile editor.
To accomplish our goals, we'll need to make a few changes to this profile. If you recall from our last article, we want MessageExport to automatically process only emails that our Outlook rule has moved into a folder called "Email to PDF."
In the Profile Editor, locate the "Main Export Settings" area, and find the "Export From" list. Select "Predefined Folder."

This will cause the "Select Folder" window to appear. Keeping with our example, we chose the Email To PDF folder.
Click OK to continue.
Locate the section called "Export History" and check the box next to, "Turn on Export History." This will prevent MessageExport from exporting messages more than once. We actually don't need to check this box, because we will be deleting the messages after export (I just wanted to show you this useful feature), but it doesn't harm anything.
Our next task involves telling MessageExport where it should store the PDF files it creates from the mails in the "Email to PDF" folder. We can do this from the "Output Folder" tab. Click browse and choose the location of a folder on your computer where the PDF files should be stored.
Select "Remove all source messages." This will cause exported emails to be deleted from Outlook.
Click the "Scheduler" tab. Here you can tell MessageExport to run this profile automatically. In my example, I will run the profile every 10 hours, specified in minutes (600 minutes).
On the MessageExport Scheduler tab, choose the first execution date. For example, if you want it to run every day at noon, select the date of the first execution at noon, and then Repeat Every 1,440 minutes (24 hours). You can also specify a "Last Execution" date, after which the profile will no longer run automatically.
You've just created a MessageExport profile that will automatically export email messages from a selected folder, convert them to PDF with attachments embedded, keep track of all emails it's exported to prevent duplication, remove the source email file from Outlook, and do this on a regular scheduled basis.
There are many other MessageExport features that we didn't have time today to address. Feel free to poke around the MessageExport profile editor, and see what else you can make it do.
For more information visit the MessageExport home page, or leave us a comment below and we'll be in touch!
Thanks for reading!
The first step of our project involved creating an Outlook rule to collect messages we received from a client's email domain and copy them to a specific Outlook folder.
This article describes Step 2: Creating a custom MessageExport profile. It will perform these 4 functions:
a. Convert new messages added to a folder into PDF files.
b. Delete the messages after they have been converted.
c. Perform this operation again in xx minutes.
d. Prevent duplicate PDF files by remembering which emails have already been exported.
Getting Starting.
If you haven't already, download and install copy of MessageExport for Outlook. The free trial runs for 15 days, and will allow you to follow along with this article.
After installation, MessageExport appears in Outlook 2013 on a separate tab.
 | |
| MessageExport in Outlook 2013 |
In normal use, a message or group of messages in highlighted in the Outlook mail list. If the user wants to export those highlighted messages to PDF, they would select "Export to PDF" from the drop down list, and then click "Export." MessageExport would then go to work converting the selected emails into PDF files.
Today, we're going to go a little beyond "normal" use and setup a customized MessageExport profile that will accomplish the steps we described earlier.
Customizing a MessageExport Profile.
Since the project we began in our last article calls for converting email in a specific folder into PDF files, lets' begin with the profile that most closely matches what we want to do.
Select the profile named "Export to PDF - attachments embedded." This profile will convert an email into PDF while embedding any file attachments inside the PDF. Those files can later be extracted from the PDF and edited, rather than become part of the PDF image. MessageExport provides several ways of processing email file attachments, including converting them into the PDF image, extracting them, or embedding them as individual files. You can start with the profile that most closely matches our preferences.
Now that we have selected or MessageExport profile, we're going to edit it and create a new profile that will accomplish the three aforementioned steps. To edit the export profile, click the Tools Icon in the MessageExport toolbar.
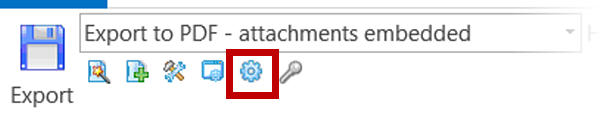
 |
| Click Tools Icon to Edit Profile |
Selecting the source folder
To accomplish our goals, we'll need to make a few changes to this profile. If you recall from our last article, we want MessageExport to automatically process only emails that our Outlook rule has moved into a folder called "Email to PDF."
In the Profile Editor, locate the "Main Export Settings" area, and find the "Export From" list. Select "Predefined Folder."
This will cause the "Select Folder" window to appear. Keeping with our example, we chose the Email To PDF folder.
 |
| Selecting the Email to PDF email folder in Outlook. |
Preventing Duplication of exported emails
Locate the section called "Export History" and check the box next to, "Turn on Export History." This will prevent MessageExport from exporting messages more than once. We actually don't need to check this box, because we will be deleting the messages after export (I just wanted to show you this useful feature), but it doesn't harm anything.
 |
| Export history prevents duplication. |
Chose the target folder for exported emails
Our next task involves telling MessageExport where it should store the PDF files it creates from the mails in the "Email to PDF" folder. We can do this from the "Output Folder" tab. Click browse and choose the location of a folder on your computer where the PDF files should be stored.
 |
| Select the folder where PDF files will be saved. |
Deleting the Emails
After the emails are exported to PDF, we want to delete the messages. We can tell MessageExport to do this from the "After Export" tab. |
| Delete Outlook messages after exporting to PDF. |
Select "Remove all source messages." This will cause exported emails to be deleted from Outlook.
Repeating the PDF Export Operation Automatically
Our requirement calls for automating this operation. Now that we have our custom profile, let's configure it to run automatically.Click the "Scheduler" tab. Here you can tell MessageExport to run this profile automatically. In my example, I will run the profile every 10 hours, specified in minutes (600 minutes).
On the MessageExport Scheduler tab, choose the first execution date. For example, if you want it to run every day at noon, select the date of the first execution at noon, and then Repeat Every 1,440 minutes (24 hours). You can also specify a "Last Execution" date, after which the profile will no longer run automatically.
 | ||||
| MessageExport scheduler automates exporting Outlook email. |
Click Ok, and you've just saved your custom export profile.
Wrapping it up
You've just created a MessageExport profile that will automatically export email messages from a selected folder, convert them to PDF with attachments embedded, keep track of all emails it's exported to prevent duplication, remove the source email file from Outlook, and do this on a regular scheduled basis.
There are many other MessageExport features that we didn't have time today to address. Feel free to poke around the MessageExport profile editor, and see what else you can make it do.
For more information visit the MessageExport home page, or leave us a comment below and we'll be in touch!
Thanks for reading!
No comments:
Post a Comment